Availability: Ultimate edition
Use image stacks in IRT Cronista to organize infrared images of the same object taken at different times. A stack keeps related images together so that you can compare inspections and document changes over time.
When infrared images are grouped into stacks:
·The stack appears as one item in image lists, while its images remain separate files.
·Analyzer mode displays the images in a stack together for comparison.
·Use Trends to review changes over time.
·To design reports that can compare images over time in IRT Cronista, see Report templates for image stacks.
Create an image stack
Create a stack in Organizer mode by dragging one infrared image onto another or by using Cut or Copy followed by Paste.
To create a stack by drag and drop:
1.Open the folder that contains the infrared images.
2.Drag one infrared image onto another infrared image.
3.Release the mouse button over the target image.
To create a stack using Cut or Copy and Paste:
1.Right-click the infrared image you want to add.
2.Select Cut to move the image, or Copy to keep the original. The image is moved or copied when you paste.
3.If the target infrared image is in another folder, open that folder.
4.Right-click the target infrared image.
5.Select Paste from the image's context menu.
After Paste, the new stack contains both images. If you used Cut, both images move into the stack. If you used Copy, the stack contains copies of both images and the originals remain in their folders.
Note: The paste destination depends on where you open the context menu. Right-click an infrared image to create a stack, an existing stack to add images to it, or an empty area in Folder Contents to paste into that folder. |
A stack name appears in square brackets.
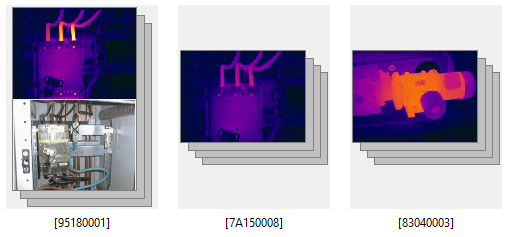
Add images to a stack
Follow the procedure above, but right-click the existing stack as the paste destination. Cut followed by Paste moves the image into the stack; Copy followed by Paste adds a copy and leaves the original in its folder. You can also drag an individual infrared image onto the stack.
Note: You cannot drag a stack onto an individual image. Drag the individual image onto the stack. |
Remove an image from a stack
To remove an image from a stack without deleting the file, cut it from the stack and paste it into a folder outside the stack:
1.Right-click the stack in Folder Contents.
2.Select Grouped Items.
3.In the window that opens, right-click the image you want to move out of the stack.
4.Select Cut.
5.In the main Organizer window, open the folder where you want to place the image.
6.Right-click an empty area in that folder's Folder Contents window.
7.Select Paste.
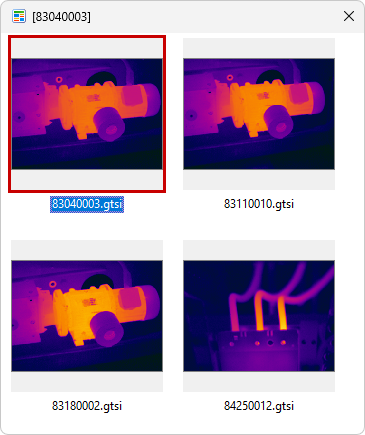
Note: The image leaves the stack only after you paste it into the destination folder. To copy it out while keeping it in the stack, select Copy instead of Cut in step 4. |
Notations for stacks
Important: Changing the stack's notations in Organizer mode applies those changes to every image in the stack. |
To change notations for only one image:
1.Right-click the stack.
2.Select Grouped Items.
3.Click the image to give it focus.
4.Edit its notations in the Notations window.