Measurement object labels identify objects and display selected measurement values directly on an infrared image. The default contents depend on the object type. For example, a spot label shows its temperature, while line and area labels show their minimum and maximum temperatures.
You can change a label's identification, contents, and appearance. You can also move labels with the selection tool.
Open the label dialog
1.Select the selection tool 2.Right-click the measurement object. 3.Select Label .... 4.Change the label settings. 5.Click OK. |

Alternatively, double-click the label. Changes appear on the image while the dialog is open. Click Cancel to restore the settings that were in effect when you opened the dialog.
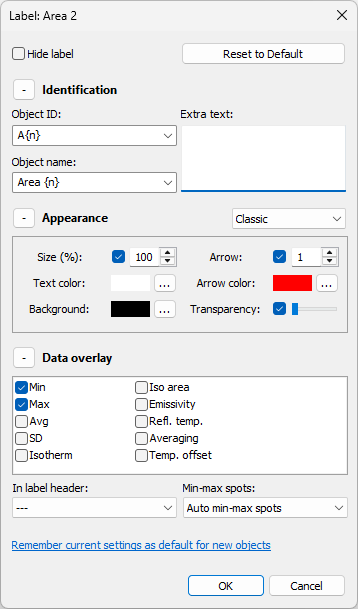
Hide label hides the entire label without deleting the measurement object.
Identification
Availability: Object ID and Object name are available in version 2026 Professional and Ultimate editions
Expand Identification to configure the following information:
·Object ID: Sets the compact identifier shown in the label header.
·Object name: Sets the descriptive name used in locations such as the Properties window and report fields.
·Extra text: Adds custom text to the label. The text can contain multiple lines.
Use a placeholder in an object ID or object name to create a unique value from the object's sequence. {n} inserts a number, {A} inserts an uppercase letter, and {a} inserts a lowercase letter. For example, Area {n} produces names such as Area 1 and Area 2.
Appearance
Expand Appearance to configure the label and object display:
·Classic and Plain select the display style.
·Size (%): Sets the label size. The adjacent check box makes the text bold.
·Text color: Sets the label's text color.
·Background: Sets the label's background color.
·Arrow: Shows or hides the arrow between the label and its object. The value sets the arrow width.
·Arrow color: Sets the arrow color.
·Transparency: Adjusts the label background from opaque to transparent. The adjacent check box outlines the text with the background color to keep it visible against the image.
Click an ellipsis button beside a color to select another color.
Data overlay
Expand Data overlay to select the values shown in the label. The available properties depend on the measurement object type.
Use In label header: to display one eligible property beside the object ID in the label header. Select --- to keep the selected properties in the label's data rows.
For line and area objects, use Min-max spots: to control markers at the minimum- and maximum-temperature locations. Auto min-max spots displays a marker when the corresponding minimum or maximum property is included in the label. The other options always show both markers, show one marker, or show neither marker.
Change multiple labels
To apply the same settings to several labels, select the measurement objects and open the label dialog from one selected object. The changes apply to all selected objects. When selected objects have different types, only settings common to those types are available.
Hold down Shift while clicking objects to select more than one. See Selection tool.
Default label settings
Select Remember current settings as default for new objects to use the current supported label settings for subsequently created objects. Existing labels do not change.
Click Reset to Default to apply the saved defaults to the label or selected labels currently being edited.