Assign notations to associate an image with information of your choice. You define the categories and entries to suit your needs; they can cover any subject. The folder's notations set provides the available entries; each image can use a different selection.
You can edit image notations in Organizer or Analyzer mode. In Organizer mode, the Notations window shows the notations for the focused image - the image displayed in Preview. Selecting several images does not apply these edits to the entire selection.
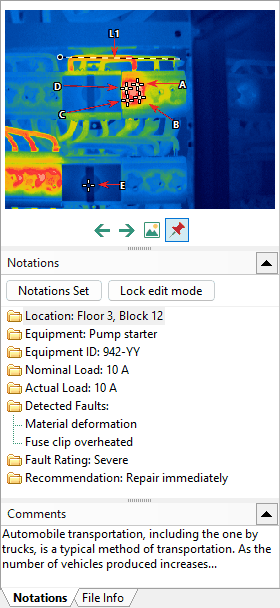
Show image notations in Organizer mode
1.If Preview is hidden, select View > Preview.
2.If the information area is hidden, select View > Infoview.
3.Click the image in Folder Contents to give it focus.
4.Select the Notations tab next to File Info.
Choose the folder's notations set
If the required entries are already available, you do not need to choose another set. A folder can use inherited notations, including Shared notations, or a set linked from the Notations briefcase or a report template. Folder notations provides an advanced way to define entries for a folder.
1.Click Notations Set at the top of the Notations window.
2.Click Select Notations.
3.Choose a source from the options described below.
4.Click OK in the Notations Set dialog to keep the change.
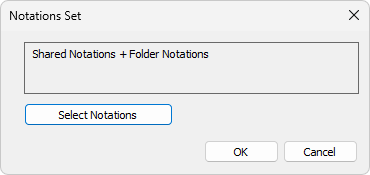
The dialog identifies the current sources. The example combines Shared Notations and Folder Notations.
·Reset to Default: Removes the explicit link and uses the folder's own notations, if present, together with any inherited notations allowed by its inheritance settings. This option is unavailable when the folder already uses the default.
·From Notations Briefcase: Opens the briefcase. Select a set and click Assign.
·From a Report Template: Opens the template selection dialog. Choose a template that contains notations. Templates without stored notations cannot supply a set.
Note: Choosing a set changes the available notations for the folder, not just the focused image. It does not mean selecting the same entries for every image. |
Select entries for an image
1.Click the image you want to annotate.
2.Click inside the Notations area to show the available entries.
3.Select the check boxes or option buttons for the entries that apply to the image.
A category with check boxes allows multiple selections. A category with option buttons allows one selection.
When the notations area has keyboard focus, it shows all available entries. When you click elsewhere, it normally shows only the entries selected for the image. Select Lock edit mode to keep all available entries visible. This locks the editor's display mode, not the focused image.
Note: Editing a stack's notations in Organizer mode applies the changes to the stack's images. To edit one image in a stack, open Grouped Items and give that image focus. See Image stacks. |
Add an entry that is missing
To add an entry for the focused image only:
1.Click inside the Notations area to enter edit mode.
2.Right-click the category that should contain the entry.
3.Select Insert Notation.
4.Type the new entry.
5.Press Enter to finish editing.
The new entry is selected for the image. If you need a new category, use Insert Category first. To make an entry available to other images, edit the folder's source set instead; see Creating a notations set. Changes to a shared or linked set affect every folder that uses it.
Add comments
Use Comments below the notations to enter free-text details for the focused image. Comments are separate from the reusable entries in the notations list.
Remove image-specific entries or selections
Clear an editable check box to stop using that entry for the image. In a single-selection category, choose the entry that should apply instead.
To delete an entry added directly to the image, right-click that entry and select Delete. Inherited entries belong to the source set and cannot be deleted from the image's list. Edit or clear Comments separately.
Copy notations between images
Note: With a well-designed notations set, copying notations between images is unnecessary. Include reusable categories and entries in the set so they are available to every image that uses it. Then select the entries that apply to each image. |
The notations editor copies categories and entries with their selection states. It does not copy the linked set file or the Comments text. Paste adds copies; it does not replace the destination's existing notations. If a name already exists, the pasted name receives a numeric suffix.
Keep Lock edit mode selected during the following procedure so that the notations list remains in edit mode.
1.Click the source image.
2.Right-click a blank area in its Notations list, outside any category or entry.
3.Press Esc to close the menu without selecting a command.
4.Press Ctrl+C to copy the list.
5.Click the destination image.
6.Right-click a blank area in its Notations list.
7.Press Esc to close the menu.
8.Press Ctrl+V to paste.
Right-clicking a blank area clears the category or entry selection so that the clipboard operation applies to the whole list. It does not clear any checked entries.
To copy only one category, click its name instead of performing steps 2–3, then continue from step 4. To copy one entry, click its text before copying and select the destination category before pasting.